
Step 1 – Install Edcast Application
Download the Edcast application software and install it. This is a free application that can broadcast live audio to our servers.
Link – Download Edcast installer (This is the older version)
Download Edcast Reborn Installer
Run the installation, the program by default will be installed into “C:\Program Files\edcast“, its recommended to change this to “C:\edcast”
It’s recommended to accept the default installation options, if asked to install the “Visual Studio 2005 Redistributable“, select YES, and continue.
Step 2 – Install the LAME MP3 Encoder DLL
Download the file below, and extract the file lame_enc.dll into the same location as your edcast installation, usually “C:\edcast”
Link – Download the mp3 encoder dll
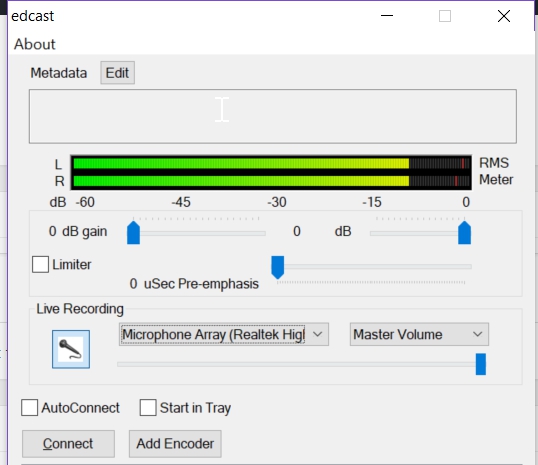
Step 3 – Start Edcast Application and configure sound source
- (1) This will differ depending on your sound card, select the appropriate device where your live audio source is plugged into. Recommended input is “Line In“
- (2) If you wish to see real-time VU levels simply click in this area to enable the Peak Meter

Step 4 – Add & Configure the encoder
- (3) Click the ‘Add Encoder’ button
- (4) Right-click the new encoder that appears below it
- (5) Choose ‘Configure’ from the menu that appears

In the ‘Basic Settings’ section, set up the encoder.
- (6) Select “Use Bitrate” , enter your chosen bitrate – this must be equal or lower than the rate you purchased, 64 Recommended
- (7) Enter your samplerate – 44100
- (8) Number of channels – 2
- (9) Select the ‘MP3 Lame’ encoder
- (10) Select ‘Shoutcast’
- (11) Enter the host name of your assigned server
- (12) Enter the port number for your account
- (13) Enter the DJ or Admin password of your server
- (14) Leave as is
- (15) Change this to 15


-
- (16) In the ‘YP Settings’ section, un-tick the public server option, as this is not needed here.
- Click [OK] to close the window
Step 5 – Start encoding
- (17) Tick the ‘AutoConnect’ box
- (18) Hi lite the new encoder, then click the ‘Connect’ button
- You should see information about the encoder status in the ‘Transfer Rate’ column. If it’s working properly, a numeric value will appear indicating the transmission speed.

Step 6 – Recommended windows settings
- Add Edcast to your startup group so it starts automatically with windows
- Set your operating system to “Auto Login” this way if your PC is restarted your stream will auto reconnect without user intervention
- We recommend disabling windows updates, and doing them manually as needed. If windows updates is left enabled the PC may automatically restart when new updates are added, with the frequency of windows updates being quite high is has the potential to annoy online listeners causing stream dropouts/interruptions.
- Check your power settings to ensure the PC doesn’t go to sleep or hibernate after a period of inactivity, select the “Always ON” option.